Water Heater Expansion Tank: Installation Process
Weather changes can damage your pipes, but a water heater expansion tank keeps them from breaking. Water grows when it gets hot, which stresses your pipes and water heater. If you don’t have an expansion tank, this pressure can break lines, make the water heater last less long, and even cause leaks. This guide has everything you need to know about installing an expansion tank on a water heater, such as the tools you’ll need, the steps you need to take, how much it will cost, and how to keep it in good shape.
What Is a Water Heater Expansion Tank?
A water heater extension tank is a small tank next to your water heater. There is a plastic cushion between the two compartments:
- Air chamber – takes in extra pressure.
- Water chamber – ties into your water heater system.
When water gets hot and expands, the extra volume pushes against the diaphragm and squeezes the air chamber instead of putting stress on your pipes.
You can compare an expansion tank to a portable water heater to see how they work. An expansion tank protects your home on a bigger scale.
Why You Need a Water Heater Expansion Tank
This is why people choose to put one in:
- Stops leaks and pipe damage caused by too much water pressure.
- Especially in closed-loop systems, it makes water heaters last longer.
- Follows the rules for pipes in many places.
- Makes the system work better by putting less stress on the connections.
People who use instant geysers or tankless water heaters don’t always need expansion tanks, but regular tank water heaters should definitely get one.
Tools and Materials Needed
Before you begin installing the water heater expansion tank, make sure you have:
- Adjustable wrench
- Pipe cutter
- Drill and bolts for fixing
- Teflon tape
- Pipes made of copper or PEX
- Pressure gauge
- Thanks for the expansion (the right size for your system)
Step-by-Step Guide to Water Heater Expansion Tank Installation
1. Turn Off Utilities
Turn off the heater’s water and gas (or electricity)—first, safety.
2. Check System Pressure
- Put a water pressure measure on a tap and use it.
- The best pressure for a home is between 40 and 80 psi.
- A pressure-lowering vent might help if it’s too high.
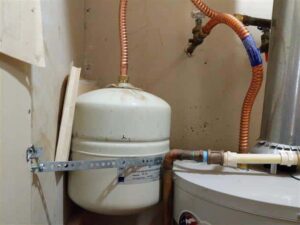
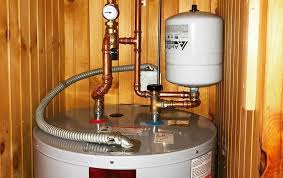
3. Choose the Installation Location
Most of the time, expansion tanks are put on top of the water heater and connected to the line that takes in cold water.
4. Install the Expansion Tank
- Cover threaded parts with Teflon tape.
- The tank is linked to the cold water line with a T-fitting.
- To make the links tighter, use a bendable wrench.
5. Adjust Air Pressure in the Tank
- Use a tire measure on the Schrader valve (on top of the tank).
- The water pressure in your home is usually 60 psi, so ensure that the air pressure is the same.
6. Restore Utilities and Test
- Restart the power and water.
- Run hot water to make sure everything works well.
- Look for leaks where the wires join.
Find out how to flush your water heater to get rid of the sludge that has built up. This is going to help you take even better care of yours.
Maintenance Tips for Expansion Tanks
For a long-lasting growth tank:
- Once a year, use a tire gauge to check the air pressure.
- Inspect for leaks around fittings.
- Change it when it breaks; most last 5–10 years.
- For energy savings, use electric geyser tips.
Costs of Expansion Tank Installation
How much does putting an expansion tank on a water heater cost?
- What size the tank is (2 to 5 gallons for most homes)
- Rates of pay per hour in your area
- More work needs to be done on the plumbing.
Most expansion tanks cost between $50 and $150, and having an expert install them may cost an extra $100 to $300. Check out how much it costs to install a water heater to understand how expansion tanks fit into the bigger picture.
Conclusion
Putting the expansion tank on your water heater in the right place will last longer and keep your lines from getting damaged by high pressure. If you’re getting rid of old gear or setting up a new system, these steps will ensure the installation is safe and goes well. Along with regular care, you should flush your portable water heater and do other things to make sure it stays in good shape for years to come.
FAQs
Q1: What is an expansion tank for a water heater, and why do I need one?
An expansion tank in a water heater soaks up the extra pressure from water expanding when it gets hot.
Q2: Can I put in my own water heater expansion tank?
It can be put in by a skilled do-it-yourselfer with the right tools, but it’s best to have a professional do it to ensure it’s the right size, in the right place, and meets safety standards.
Q3: How can I tell if my expansion tank is working right?
Tap the tank to see if it works. One side should sound hollow (air chamber) and the other sound solid (water). A tire gauge can also be used on the Schrader valve to check the air pressure.
Q4: How long does the tank that holds water in a water heater last?
Depending on the water quality, pressure, and care, an expansion tank should last between 5 and 10 years on average. Checking it often can make it last longer.
Q5: Does every water heater need an expansion tank?
Not all the time. Water can’t flow back into the main supply line when plumbing is cut off. This is why expansion tanks are needed. Because they are safer, many building rules now require them.
External References
For more technical insights, see: