What Is Rough-In Plumbing and How Does It Work?
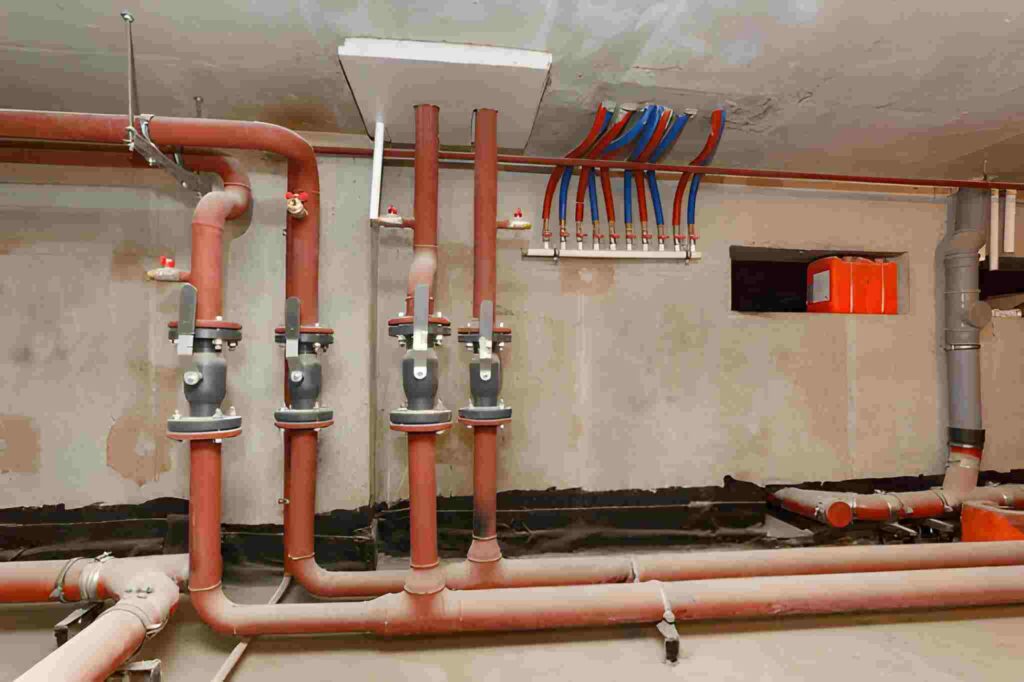
What Is Rough-In Plumbing and How Does It Work? Introduction When constructing or renovating a home, one of the most critical steps before finishing walls and floors is Rough in Plumbing. During this step, the structure’s pipes, drains, and water lines are laid out. If you do it right, it makes sure that water flows smoothly, drains properly, and meets building codes. Rough in Plumbing is the “skeleton” of your plumbing system. It’s everything that goes on behind the walls before you see the fancy taps and fixtures. Knowing how this step works helps homes avoid mistakes that cost a lot of money and makes sure that the final installation goes more smoothly. What Is Rough-In Plumbing? Rough-in plumbing means putting in water lines, drain pipes and venting systems before the final finishes, plasterboard and floors are put down. Plumbers plan out how water will enter and leave your home during this first stage of setup. In general, this process includes: Setting up the main lines for water and drains Putting in vent stacks to control air pressure Getting the base ready for things like toilets, sinks, and showers Making sure the slope and placement are right for gravity-fed drainage Basically, the invisible but important part of plumbing that affects how well your system will work when everything is done. Why Rough-In Plumbing Is So Important Doing a good job with the Rough in Plumbing stage can save you a lot of money on fixes later on. Pipes that aren’t put in properly can leak, overflow, or not have enough water pressure. This is why it’s important: Prevents Future Leaks: Ensures that the pipes are properly connected and sealed. Maintains Water Pressure: The right pipe size ensures even spread of water. Supports Drainage Efficiency: Slow sinks and gurgling sounds can be avoided with the right venting. Ensures Code Compliance: Placement, material, and slope angles are all controlled by local plumbing rules. One example is a vent system that doesn’t work right can cause smells or draining problems. Read our in-depth guide on plumbing air pipes to learn more about this. Phases of Rough-In Plumbing There are three main stages of rough-in work, and each one needs skill and attention to detail. 1. Water Supply Rough-In In this step, the lines that bring clean water to your fixtures are laid. Materials like copper, PEX, or CPVC are often used. To keep water flow at multiple fixtures, each line must be the right size. 2. Drain-Waste-Vent (DWV) Rough-In This system gets rid of waste water and keeps sewer gases from getting into your house. It’s very important to make sure there is enough ventilation, especially in bathrooms, kitchens, and wash rooms. 3. Fixture Layout Finally, plumbers mark where sinks, tubs, toilets, and other items will go in the future. Before the walls are closed, these places are checked to make sure they are accessible and follow the rules. Rough-In vs. Finish Plumbing Many homeowners confuse Rough in Plumbing with finish plumbing. The key difference lies in timing and visibility. Stage Description Visibility Rough-In Pipes, vents, and drains are installed within walls and floors. Hidden Finish Plumbing Fixtures like faucets, toilets, and showers are connected and visible. Visible To put it simply, Rough-In builds the system and Finishing brings it to life. Common Materials Used in Rough-In Plumbing PEX (Cross-linked Polyethylene): It’s bendable, simple to put in place, and won’t rust. Copper: Ideal for both hot and cold water because it is strong and doesn’t melt. PVC: Often used for vent, drain, and waste lines. ABS (Acrylonitrile Butadiene Styrene): Pipe made of strong plastic that is often used in DWV systems. If your house was built many years ago, it may still have old systems like polybutylene lines that need to be replaced when the house is renovated. How Long Does Rough-In Plumbing Take? How long it takes depends on how big and hard the job is. New homes: Three to five days Small renovations: Within two days Commercial buildings: It might take weeks. The schedule is also affected by things like getting building permits, going through inspections, and working with electricians or HVAC experts. Cost Factors of Rough-In Plumbing Several things can change the cost of Rough-In: Size and plan of the home Home’s bathroom and kitchen countHome’s bathroom and kitchen count What kind of pipes are used Being able to get into crawl areas or walls Prices for labour and water rules in your area Talk to a neighbourhood plumber to get an accurate quote. You can read about average prices for installation and replacement in guides like “plumber cost to replace your garbage disposal.” Inspections and Building Codes Every Rough-In work has to follow the rules set by the local plumbing department. Before the walls are sealed but after the pipes are put in, a tester makes sure: Right pipe slopes The right vent links Joints that don’t leak How far apart water and power lines should be A failed inspection can delay a job, so only hire licensed experts. Bathroom and kitchen plumbing that is already roughed in It’s important to plan ahead for bathrooms and kitchens because they have a lot of water sources and drains. Bathroom Rough-In: Includes installation for toilets showers bathtubs and sinks. Correct pipe slopes prevent standing water and odor problems. Kitchen Rough-In: Mostly talks about washbasin drains, dishwasher lines and water hookups for refrigerators. Learn some DIY plumbing tips for your kitchen sink and bathroom to handle small upgrades after Rough-In. Troubleshooting Common Rough-In Issues Incorrect Slope or Alignment: Slows down flow. Improper Venting: Leads to the smell of sewer gas. Leaks at Joints: Usually due to poor soldering or loose fittings. Clogs in Drain Lines: Can occur if debris enters pipes before sealing. For extensive repairs a commercial plumber or residential expert can identify and fix issues efficiently. Safety and Best Practices Use high-quality pipe materials. Always follow the bathroom rules in your area. Set up checks before putting up the plasterboard. Label all the
What Is a Plumbing Vent Pipe and Why It Matters
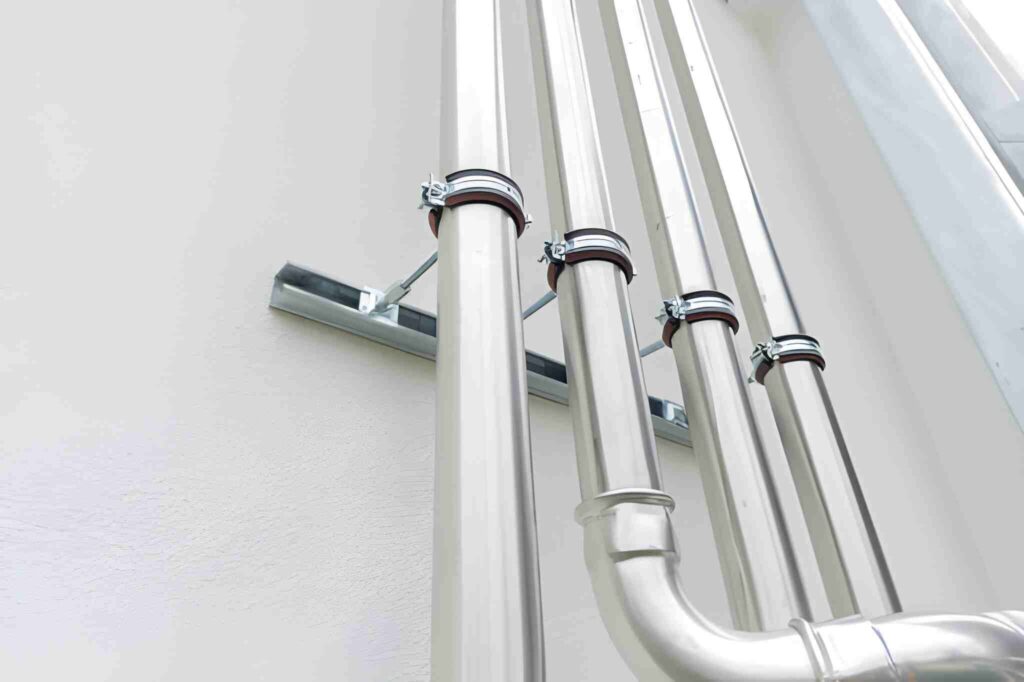
What Is a Plumbing Vent Pipe and Why It Matters A plumbing vent pipe is an important part that keeps everything going smoothly. When you think of plumbing, you probably think of water supply and drainage. Most of the attention is on pipes that carry water and waste, but air pipes keep your system safe, clean, and working well. Your sinks, toilets, and drains wouldn’t work right without a good plumbing vent pipe. This guide describes air pipes, why they’re important, common problems they can have, and how to keep them in good shape. What Is a Plumbing Vent Pipe? A vent pipe which is also known as a vent stack does not carry water or trash. Instead it keeps the air pressure in your drainage system in check and lets sewer gases escape safely through the roof. You can think of it as the “breathing mechanism” for the pipes in your home. The same way that your lungs need air to work your drain lines need air flow to keep wastewater moving. Why Plumbing Vent Pipes Are Important Vent lines are very important to the health of your home, even though you can’t see them. This is why they’re important: Prevents Sewer Gas Build-Up Dangerous fumes, like methane, could build up inside without vents. They can get out of the building through a vent pipe. Maintains Water Seal in Traps A P-trap holds water to keep sewer gases from getting through. It’s in every washbasin and toilet. With the right opening, that water seal stays in place. Ensures Smooth Drainage Ventilation prevents negative air pressure that would otherwise slow or stop drainage. Protects Plumbing Fixtures From the washbasin in the kitchen to the toilet in the bathroom, properly vented drains reduce clogs, gurgling noises, and backflow. How Plumbing Vent Pipes Work The vent stack usually runs vertically through your home and exits through the roof. Putting trash water down a drain can make suction that can pull water out of traps nearby. The exit pipe lets air in to keep the pressure even, which keeps the water in the trap and the gases out. Common Problems With Plumbing Vent Pipes Systems that are built very well can still have problems with draining. Here are some problems that homes often have: 1. Clogged Vent Pipe Roof vents can get blocked by bird nests leaves or other junk. This makes sinks move slowly smell bad or make gurgling sounds. 2. Poor Installation If a house’s venting system doesn’t follow building rules it could lead to flooding issues that happen often.2 3. Frozen Vent Stack When it’s cold outside, vent lines can freeze, which traps gases and makes the system less efficient. 4. System that is old or broken Some old homes may have polybutylene lines or other old materials that don’t work as well as they should. Find out more about water issues with polybutylene. Signs Your Plumbing Vent Pipe May Be Failing Strong, unpleasant smells inside the house Toilets or sinks that gurgle bathtubs or baths that drain slowly Toilet bowls’ water amounts going up and down backed up sewers, especially after it rains If you notice these signs, you should call a plumber instead of trying to fix it yourself, which could be dangerous. For some problems, like roof vents that are jammed, you need special tools and to be careful. DIY Plumbing Tips for Vent Pipes While big fixes should be done by a professional, here are some plumbing tips that anyone can try: Visual Inspection: Look for things that you can see in the roof vent. Use a Garden Hose: Gently flush the vent to get rid of any clogs. Plunger Method: Sometimes plunging a sink or toilet can clear minor airlocks. See these do-it-yourself plumbing tips for your kitchen sink and bathroom for more step-by-step help. When to Call a Plumber If vent problems don’t go away, you need to call a qualified plumber right away. Professionals can use special cameras to look inside lines and find blockages that are hidden. For instance, if you live in Georgia and need a plumber, hiring a Lawrenceville plumber from your area will make sure you get help quickly and in line with local rules. For certain issues, like low water flow, you’ll need a plumber who knows how to fix more than just venting problems. To fix low water flow, learn how to find the best plumber. Cost Considerations for Vent Pipe Repairs The cost of vent repairs depends on: Where the blockage is (on the roof or underground) How long your plumbing has been around How hard it is to change where pipes go or replace them Vent problems can happen at the same time as replacing fixtures. For instance, replacing a trash disposal might show that the venting isn’t working right. Check out the plumber cost to replace a garbage disposal for insights. What Plumbers Handle Beyond Vent Pipes Vent pipes are just one part of a plumber’s expertise. They also handle: Commercial plumbing services Fixture installations and repairs Sewer line replacements Emergency drain cleanouts (see this plumbing cleanout guide) Many homeowners are curious about the profession itself—like how long it takes to become a plumber or the differences between plumber pay rate vs. hourly rate. Best Practices for Modern Plumbing Systems To keep the vent pipe and the rest of your drainage system healthy: Plan checks once a year Keep things out of roof vents. Update old tools to meet today’s standards Use devices that save water to ease the strain. And while men have traditionally been more likely to work in plumbing, that is starting to change. Meet some female plumbers who are breaking gender norms and making home services better in the future. Conclusion The plumbing vent pipe is the unsung hero of your home’s drainage system. It keeps sewer gases out of your home, makes sure water flows smoothly, and makes sure faucets work right. Vent lines are important to know about whether you have a clogged vent or are
Polybutylene Plumbing Issues Every Homeowner Faces
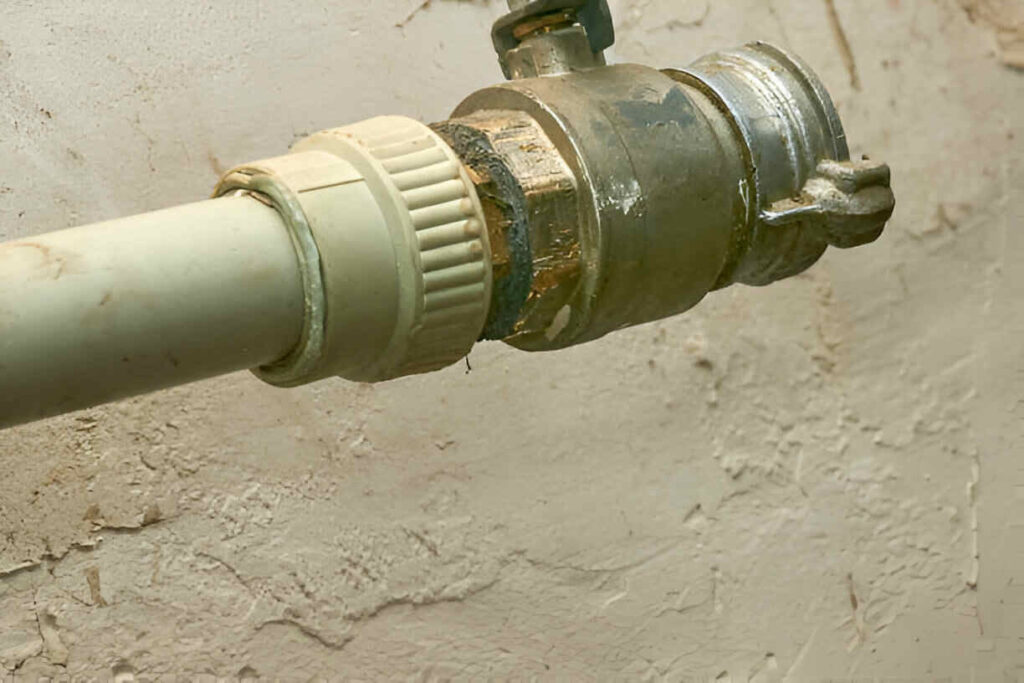
Polybutylene Plumbing Issues Every Homeowner Faces Old water systems can be a pain for homeowners all over the United States and other parts of the world. Polybutylene piping, a type of plastic pipe that was widely used from the late 1970s to the mid-1990s, is one of the most well-known old materials. It was once thought of as a creative and cheap option to copper, but it quickly became known for having hidden issues. Many property owners still have polybutylene plumbing issues today, such as leaks that happen all the time and expensive water damage. What Is Polybutylene Plumbing? From 1978 to 1995, a kind of plastic resin called polybutylene was utilized in water delivery pipes. Millions of households in the United States adopted it because it was affordable, lightweight, and simple to install, particularly in places like Florida, California, and Texas. But after many years, homeowners found that polybutylene water problems were a lot worse than they thought. Because these issues spread so much, polybutylene pipes were finally taken out of U.S. building rules. Why Polybutylene Plumbing Fails Several scientific studies and comments from homeowners have pointed out the main things that break down this material: Chemical Reactions – Chlorine and other oxidants in municipal water systems interact with polybutylene, compromising the integrity of the pipe walls. Flaking and Scaling – The inside of the pipe can wear down over time, leaving flakes that get stuck in outlets. Brittleness – After years of being out in the elements, the material becomes weak and easy to break. Poor Fittings – Acetal fittings were employed in numerous installations, which resulted in connection point failures. One unchangeable truth is brought about as a result of the combination of these factors. Polybutylene plumbing will ultimately break, frequently without any prior notice. Common Polybutylene Plumbing Issues If your house was built between 1978 and 1995, you may already be having one or more of these issues: 1. Frequent Leaks Most of the time, there are small leaks from pinholes. They usually hide behind walls, under floors, or in ceilings, so you can’t tell they’re there until you see water damage. 2. Reduced Water Pressure Debris can get stuck in faucets, showerheads, and other items when lines flake on the inside. This makes the water move more slowly. 3. Burst Pipes Sudden bursts pose a major risk. Homeowners have reported pipes breaking without any prior symptoms of leakage, resulting in thousands of dollars in repairs. 4. Mold and Water Damage Hidden leaks cause mildew, rot, and structural damage that can endanger house safety. 5. Decreased Home Value The real estate market isn’t always kind to homes with polybutylene plumbing. When buyers learn about the risks, a lot of them either back out or expect a big price cut. How to Identify Polybutylene Pipes Here are some things to look for if you’re not sure if your home has polybutylene: Color: Most of the time, black, blue, or gray. Size: Usually about ½ to 1 inch across. Location: At water heaters, sinks, crawl spaces, basements, and where the main water line enters the home. For step-by-step help with identifying Polybutylene Plumbing, you can also read our in-depth guide on the subject. Legal and Insurance Concerns In the 1990s, a class-action lawsuit (Cox v. Shell Oil) was filed against polybutylene pipes. Settlements for plumbing replacements were given to millions of households. But since these settlements have ended, homeowners are now completely liable for replacement expenses. Additionally, some insurance companies may decline to insure homes made with polybutylene, while others are hesitant to pay for losses brought on by plumbing problems using this substance. Best Solutions for Polybutylene Plumbing Problems If your residence is equipped with polybutylene infrastructure, the subsequent alternatives ought to be assessed: 1. Full Pipe Replacement (Repiping) The best thing that can be done is to replace all polybutylene lines with newer materials like PEX (cross-linked polyethylene) – It’s flexible, lasts a long time, and is highly recommended. Copper – Long-lasting and not easily corroded. CPVC – Another strong option is chlorinated polyvinyl chloride. 2. Partial Replacement Sometimes, only parts of the pipes need to be changed. This is usually only a short-term fix, though, and it’s not a good idea for long-term safety. 3. Regular Inspections If replacement is not an urgent option, arrange yearly plumbing inspections to detect leaks early on. 4. Leak Detection Systems By warning of rapid bursts, installing devices that track water leaks can help limit harm. Costs of Replacing Polybutylene Plumbing PEX Repiping: $4,000 – $10,000 Copper Repiping: $8,000 – $15,000 CPVC Repiping: $6,000 – $12,000 People who change their pipes don’t have to fix water damage, which can cost over $20,000 if the lines break. Preventing Water Damage Be careful if your water bill goes up all of a sudden. Check for mold, wet spots, or color changes. A trained plumber should check all of the joints and valves. Conclusion The truth is that polybutylene lines will break down, not “if,” but “when.” When these lines break, it will cost a lot to fix, your home will get water damage, and its value will go down. The best thing to do is to put in new lines made of strong materials like copper or PEX, especially when comparing Polybutylene vs PEX for durability and reliability. FAQs About Polybutylene Plumbing Issues Q1: How long do polybutylene pipes last? Depending on water chemistry and usage, some endure longer, but most fail within 15 to 20 years. Q2: Can I sell my house with polybutylene plumbing? Indeed, buyers might seek to negotiate a reduced price, or lenders and insurers could mandate repiping as a prerequisite. Q4: Should I replace polybutylene pipes immediately? Yes. If you can’t see any leaks, it’s safer to replace the part as soon as possible because it could break at any time. Reference U.S. Consumer Product Safety Commission – Polybutylene Piping Information https://www.cpsc.gov
Polybutylene Plumbing Fittings: What You Should Know
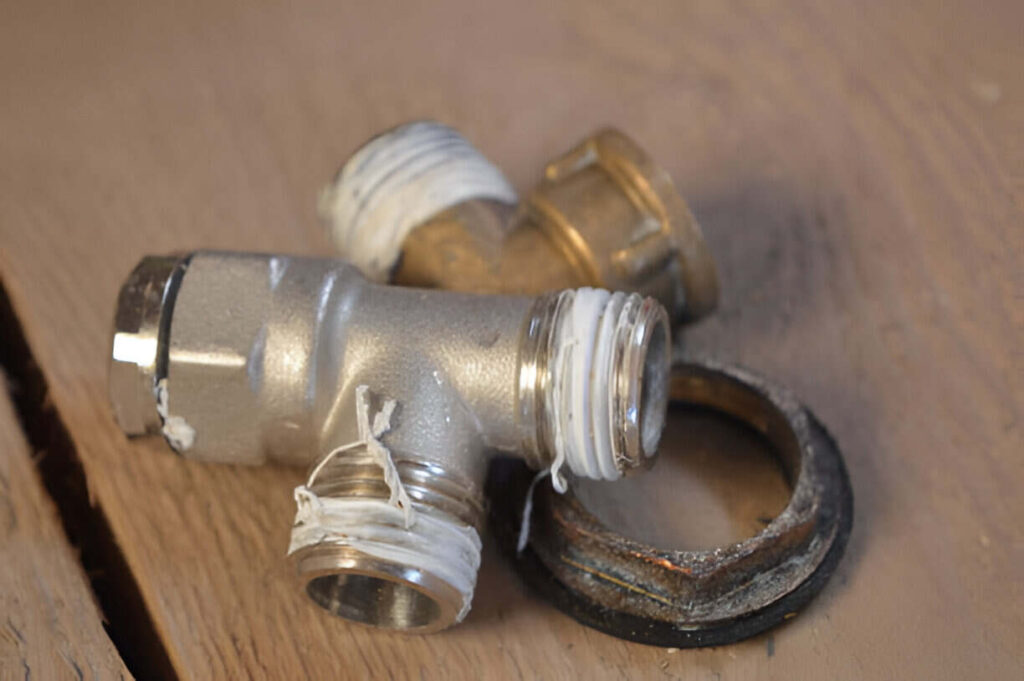
Polybutylene Plumbing Fittings: What You Should Know During the period between the late 1970s and the middle of the 1990s, the installation of polybutylene plumbing in home plumbing systems was a regular practice. Due to the fact that it is inexpensive and simple to install, it is present in millions of homes across the United States. On the other hand, households and plumbers rapidly discovered that the polybutylene plumbing fittings were frequently the weak spot of this system. There are risks with these fittings, but there are also choices. We’ll talk about those, as well as what people should do if they still have polybutylene pipes on their land. What Are Polybutylene Plumbing Fittings? When two pieces of polybutylene pipe are joined together, they are called polybutylene plumbing parts. Most of the time, these parts were made of: Plastic (acetal resin fittings) – Common but prone to cracking. Metal fittings (copper or brass) – More durable, but still susceptible to leaks. Over time, these fittings got a bad name for breaking, which led to cases and large-scale efforts to replace pipes. Why Did Polybutylene Plumbing Fittings Fail? The main issues came from: Chemical Reactions Chlorine and oxidants in municipal water supplies interact with polybutylene, compromising the integrity of pipes and fittings. Poor Durability Plastic acetal fittings demonstrated brittleness and were susceptible to cracking, especially under water pressure. Hidden Leaks Flood damage often resulted from failures occurring behind walls or under floors, which went undetected until it was too late. Signs of Failing Polybutylene Fittings Homeowners should be aware of the following factors: Parts that go around joints that are darkened or bent Several drips or leaks occur close to pipe intersections. Water pressure is lower at some fixtures. All of the walls, flooring, and ceilings have water stains on them. For the polybutylene plumbing fixtures, any one of these indicators may be an indication that they are on the verge of breaking. Polybutylene vs. Modern Plumbing Fittings Present-day plumbing materials are quite reliable, including the following: PEX (cross-linked polyethylene) uses expansion fittings or crimp long-lasting rings. Copper fittings, the use of appropriate soldering, might result in connections that are long-lasting. Brass and stainless steel fittings possess resistance to both corrosion and damage caused by pressure. These solutions provide a sense of security when compared to the obsolete polybutylene systems that are already in use. Should You Replace Polybutylene Plumbing Fittings? The whole system can fail, even if the parts look fine. For long-term peace of mind, people who have polybutylene plumbing should learn more about the risks and think about getting a full repipe. Replacement Options PEX repiping – It is cheap, flexible, and doesn’t corrode when exposed to chemicals. Copper piping – It costs more, but it lasts a long time. CPVC piping – Another choice that can be trusted for some uses. Cost of Replacing Polybutylene Fittings and Pipes The cost varies according to the measurements of the house as well as the hourly rate of labor: Partial replacement: $1,500 – $4,000 Full home repipe: $4,000 – $15,000+ Even though it costs a lot up front, rebuilding stops much more expensive water damage fixes. Conclusion People used to think that polybutylene pipe fittings were a great way to save money, but history has shown that they are very bad. If you still have polybutylene pipes and fittings in your home, you should get new ones right away to avoid leaks and water damage. FAQs About Polybutylene Plumbing Fittings Q1: What are pipe parts made of polybutylene? Polybutylene plumbing fittings link polybutylene pipes. Once widely utilized, chemical interactions and limited durability now lead them to fail. Q2: What are the signs that indicate my home has polybutylene plumbing? The late 1970s and mid-1990s homes may have gray or blue “PB” flexible pipes. These may imply polybutylene near your water heater, sinks, or crawlspace. Q3: Why do polybutylene plumbing fittings fail? Municipal water chlorine and oxidants damage fittings and cause concealed leaks. Q4: Can I replace the fittings instead of the whole system? It’s not a good idea to replace the parts. It is best to replace the polybutylene pipes with new ones made of modern materials like PEX or copper because the old ones are likely to break. External References To learn more about polybutylene plumbing: US Consumer Product Safety Commission Home Inspection Insider – Polybutylene Pipes
Polybutylene vs PEX: Which Plumbing Is Better?
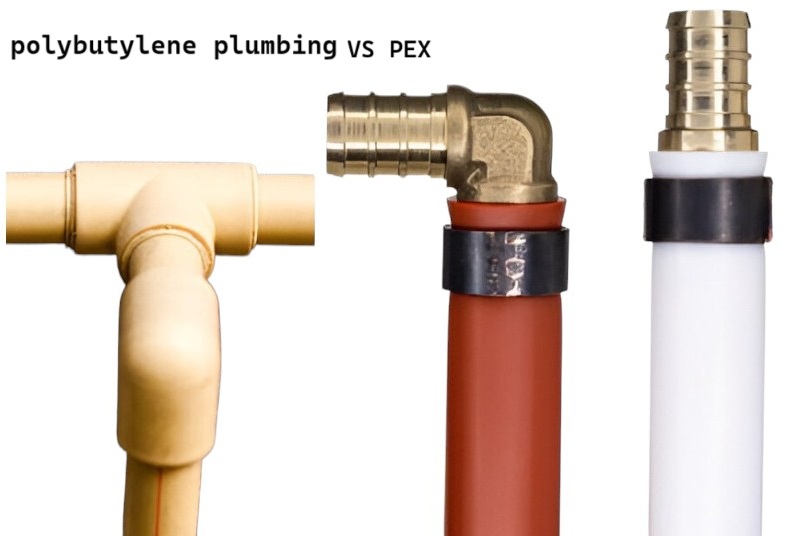
Polybutylene vs PEX: Which Plumbing Is Better? When people want to update their plumbing, they often compare polybutylene plumbing vs PEX to see which is better for their home. Homes have used both of these products in the past, but one works better, is more stable, and lasts longer. If you’re unfamiliar with Polybutylene Plumbing, learn about its history before replacing it with PEX. This article will discuss their pros, cons, pricing, and best uses to help you choose. What Is Polybutylene Plumbing? Polybutylene (PB) plumbing was introduced as a cost-effective alternative to copper pipes in the late 1970s. Up until the mid-1990s, it was widely used in millions of households across the United States and other countries, and it was made from a specific type of plastic resin. Later, polybutylene pipes were found to be fragile. Chlorine and some water treatments might make the material brittle and break down too fast. Finally, PB pipes were terminated, leaks occurred, and lawsuits were brought. Key Facts About Polybutylene: Held in homes from 1978 to 1995 leaky and cracky Metal or aluminium connections that rust easily New rules about water don’t let you do that. What Is PEX Plumbing? Cross-linked polyethylene (PEX) plumbing, a newer type of plastic pipe, came out in the 1990s. It became very famous very quickly because it lasts a long time, can be used in many ways, and doesn’t break easily. PEX is one of the materials that people most often recommend for home water systems these days. Benefits of PEX Pipes: Simple to set up and flexible (fewer parts are needed). Not easily broken by freezing Forty to fifty years if placed right It costs less than copper It works with both hot and cold water lines. Polybutylene Plumbing vs PEX: Side-by-Side Comparison Feature Polybutylene (PB) PEX Material Plastic resin (polybutylene) Cross-linked polyethylene Lifespan 10–15 years (often less due to failures) 40–50 years Durability Prone to cracking and leaks Resistant to corrosion and chemical damage Installation Rigid, requires more fittings Flexible, fewer fittings Cost Cheap initially but costly in repairs Moderate cost, low long-term repairs Code Approval Mostly banned Widely approved Why Polybutylene Plumbing Is a Concern There are some risks you should be aware of if your home still has PB pipes: Hidden Leaks – Pipes can break down on the inside without any obvious signs. Insurance Issues – They won’t cover many houses with PB lines due to several Polybutylene Issues. Resale Value Impact – Before a deal is finalised, buyers can ask for replacements. Water Damage Costs – Many people can be hurt by a single mistake. Advantages of Replacing Polybutylene with PEX Cost-Effective Upgrade – PEX is less expensive than copper, and installation takes less work. Increased Home Value – buyers see PEX as a long-term option they can trust. Improved Water Quality – Less chance of pollution from lines that are breaking down. Better Warranty Options – A large number of PEX manufacturers provide warranties of up to twenty-five years. Cost Comparison: Polybutylene Replacement vs PEX Installation Average Costs: PB to PEX Replacement: $1,500 – $8,000 (depending on home size and complexity) PEX Installation in New Homes: $1.50 – $3.00 per linear foot PEX installation may be expensive, but it reduces repair costs and water damage claims. Best Practices for a PEX Installation Your new plumbing should endure decades. Hire a PEX-experienced licensed plumber. Secure connections using expansion fittings. Avoid direct sunlight during storage and installation. Check system pressure before shutting off walls. Final Verdict: Which Should You Choose? It’s easy to see which is better between polybutylene plumbing and PEX plumbing: PEX provides superior long-term value, safety, and durability. Although less expensive at the time, polybutylene is today regarded as dangerous and outdated. If you still have PB pipes in your home, switching to PEX pipes is one of the safest and most valuable things you can do. Frequently Asked Questions What is polybutylene plumbing? From the late 1970s to the middle of the 1990s, residences employed polybutylene plumbing, a kind of plastic pipe. Because of its propensity to deteriorate and leak over time, it is no longer installed. What is PEX plumbing? Cross-linked polyethylene, or PEX, is a flexible, long-lasting, and corrosion-resistant pipe material that is used a lot in modern water systems. Why is polybutylene plumbing no longer used? It was withdrawn because it interacts with water’s chlorine, making pipes brittle and prone to failure, which frequently results in leaks and water damage. External References U.S. Consumer Product Safety Commission – Polybutylene Pipe Information PEX Piping Overview – The Spruce Polybutylene Lawsuits – Home Inspection Insider
Polybutylene Plumbing: What Homeowners Must Know
Polybutylene Plumbing: What Homeowners Must Know People once thought that polybutylene plumbing was a cool new way to bring water into homes. But over time, it got a bad name for having problems that were hard to fix and cost a lot of money to keep your home safe, you should know about the risks of polybutylene plumbing, the different types of repairs, and why it breaks. What Is Polybutylene Plumbing? This term was applied to water pipes composed of the plastic polybutylene (PB) between the late 1970s and the mid-1990s. Because the lines and Polybutylene Fittings were less expensive and simpler to set up than copper phone lines people purchased them. Key characteristics include: Stretchy and typically colored black, grey, or blue In many houses across the United States, Canada, and the United Kingdom. Often ranging from 3/8″ to 1″ in circumference. Why Was Polybutylene Popular? Because it offered several benefits at the time, polybutylene rose to fame: Lower Cost – Copper pipes are more costly. Ease of Installation – Might be assembled rapidly with fewer components. Corrosion Resistance – Initially, the intention was to prevent size accumulation. Lightweight – It facilitates movement and handling. Due to subsequent reliability issues, these gains were rendered less significant. Problems with Polybutylene Plumbing Polybutylene plumbing started to break down in many homes, even though it got good reviews at first. Because of this, there were leaks, water damage, and expensive repairs. 1. Chemical Degradation Chlorine and other disinfectants in public water systems may react with polybutylene, leading to hardness and eventual cracking over time. 2. Fitting Failures Certain PB systems incorporated vinyl acetal joints; however, these joints were prone to failure. 3. Hidden Leaks If there are line breaks behind walls or under floors, they might not be found until they’ve done a lot of damage. 4. Insurance Challenges Many insurance companies do not cover homes that have polybutylene plumbing since it has been known to fail in the past. This is the major reason why many insurance companies do not cover homes that have this type of plumbing. Indications That Polybutylene Pipes May Be in Your Home Take note of these visual cues: Pipe Colour: The colours blue, black, and grey are the ones that are seen the most frequently throughout the world. Stamped Code: The exposed section of the pipe shows the marking “PB2110.” Location: Common places to find them are crawl spaces, basements, water heaters, and sinks. Risks of Keeping Polybutylene Plumbing Water Damage Costs – Repairing a busted pipe might end up costing a pretty penny. Property Value Impact – PB plumbing could make a house less valuable when it’s time to sell it. Increased Insurance Premiums – Higher insurance rates or even being turned down outright. Replacement Options Installing new lines is advisable if your home has polybutylene sewers. Popular alternatives include: PEX (Cross-linked Polyethene): It features resistance to chlorine, along with durability and flexibility. Copper: Although it may be pricier, its durability is greater. CPVC (Chlorinated Polyvinyl Chloride): It is affordable and does not convert into chlorine. Cost to Replace Polybutylene Plumbing Average Cost: From $2,000 to $15,000, depending on the square footage of the house, the materials selected, and the labour cost. Factors Influencing Cost: How many square feet does your house have? Reaching the pipelines Materials selected for use as an alternative Pricing for nearby projects Female Plumbing Services offer trustworthy and affordable solutions for replacing old pipe systems with the help of qualified professionals. Preventive Measures If Replacement Isn’t Immediate If you find yourself unable to acquire new PB plumbing immediately, please follow these steps: Reduce water flow to reduce pipe stress. Put in a whole-house water filter to cut down on chlorine exposure. Regular plumbing inspections make it simpler to find leaks early. Conclusion Pipes made of PVC are not safe and should not be used in many older homes. It might still work but it’s not a good idea for any property because it has led to chemical damage leaks and problems with insurance in the past. Putting in new copper or Polybutylene vs PEX lines will make you feel better protect your house and save you money in the long run. FAQs About Polybutylene Plumbing Q1: Is polybutylene plumbing still used today? It stopped being made in the mid-1990s because quite a few people encountered issues with it. Q2: Can I sell my house with polybutylene pipes? Sure, but you gotta let buyers know, and it might bring down your home’s value. Q3: How long do polybutylene pipes last? A lot of them broke down in 10–15 years, even though they were meant to last 50 years. Q4: Will homeowners insurance cover leaks from PB plumbing? A lot of insurance companies won’t pay claims or cover homes with live PB systems. Q5: Should I replace my PB plumbing immediately? Yes, if you can. Replacing it is the best way to avoid sudden leaks and expensive damage. External Reference American Society of Home Inspectors – Polybutylene Facts
Plumbing Cleanout Requirements: Important Guide for All
Plumbing Cleanout Requirements: Important Guide for All It’s essential to know how to meet Plumbing Cleanout Requirements so that they are safe, effective, and easy to get to. If you want to make changes to your home or like to do things yourself, this article has everything you need to know, from code standards to the best ways to make things accessible. What are Plumbing Cleanouts? A plumbing cleanout is a hole in the drain or sewer line with a cap or plug that can be taken off. This lets plumbers get to clogs and clear them out without having to dig or take down walls. 1. Code-Based Requirements for Cleanouts International Plumbing Code (IPC) According to IPC Section 708: There must be a cleanout at the top of horizontal sewage lines and at least one every 100 feet of pipe. There has to be a cleanout at the bottom of every pile of trash or dirt. When the direction shifts by over 45° or when the building drain connects with the building sewer, additional cleanouts are required. Cleanouts shouldn’t be hidden forever; they should be easy to get to. If you follow these Plumbing Cleanout 101 tips, your drainage system will stay working well, be easy to keep up, and not get clogged up by accident. International Residential Code (IRC) IRC stipulates: There must be cleanouts every 100 feet or so for horizontal drains. Uniform Plumbing Code (UPC) UPC mandates: Cleanouts should be made from allowed materials and be made so that they don’t let water or gas in or out. Placement rules are similar to IPC in that they stress breaks, changes in direction, and ease of access. Practice & Exceptions If a line is less than 5 feet and not feeding a device like a urinal, it may not need to be cleaned out. If it’s close to the sewer connection, a two-way cleanout can be used instead of an upper terminal cleanout. Cleanouts in hard-to-reach places like slabs and spots under floors need to be extended so they can be reached. 2. Why These Requirements Matter Maintenance Readiness: When cleanouts are placed correctly, they make it easy to snake out jams. Health & Safety: If you don’t have the correct entry, sewer gases can get into your house. (The Spruce) Compliance & Inspection: Code violations can happen during exams if cleanouts are lost or not in the right place. 3. Typical Cleanout Locations in a Home At the bottom of piles of dirt close to foundations Along horizontal drain and vent runs Where the house drain meets the sewer Near places where fixtures can fall, especially when updating bathrooms or kitchens Cleanouts outside, usually near the base or yard for sewer main lines (Bardi) 4. DIY Inspection Checklist Cleanouts can be found in yards, basements, or utility rooms. Make sure there is enough space between entry places. Horizontal runs shouldn’t go over 100 feet. Cleanouts shouldn’t be hidden or blocked off; they should be straightforward and easy to get to. If the direction moves more than 45°, there needs to be a cleanout close for each one. Make sure there is a cleanout where the drain and pipe meet. Replace caps that are broken or rusted with approved ones that are gas-tight. When performing maintenance, always use a Plumbing Cleanout Plug Wrench to safely remove or tighten the plug without damaging the fitting. 5. Real-World Scenario Along a 115-foot run with 90° turns, one homeowner asked about cleanouts. According to the code (IPC 708.3.3), every change of angle greater than 45° needs cleaning. However, you can sometimes combine straight pieces that add up to no more than 40 feet, which cuts down on the number of cleanouts that are needed. Conclusion Following the rules for Plumbing Cleanout Requirements your home safe from clogs, health risks, and code violations. When updating or checking out current plumbing, make sure that the cleanouts are in the right place, easy to reach, and in line with the rules. A little care now will save you a lot of trouble (and fixes) later on. 8. FAQs Q1: Are cleanouts required for small drain segments? Only if the service pieces are longer than 5 feet, this isn’t always necessary. Q2: Can a two-way cleanout replace an upper terminal cleanout? Yes, if it is put in the right place near where the building drain meets the sewer. Q3: What clearance do cleanouts require? For pipes under 6 inches, a minimum clearance of 18 inches is required; for bigger lines, 36 inches may be needed.
DIY Guide to Using a Plumbing Cleanout Plug Wrench Set
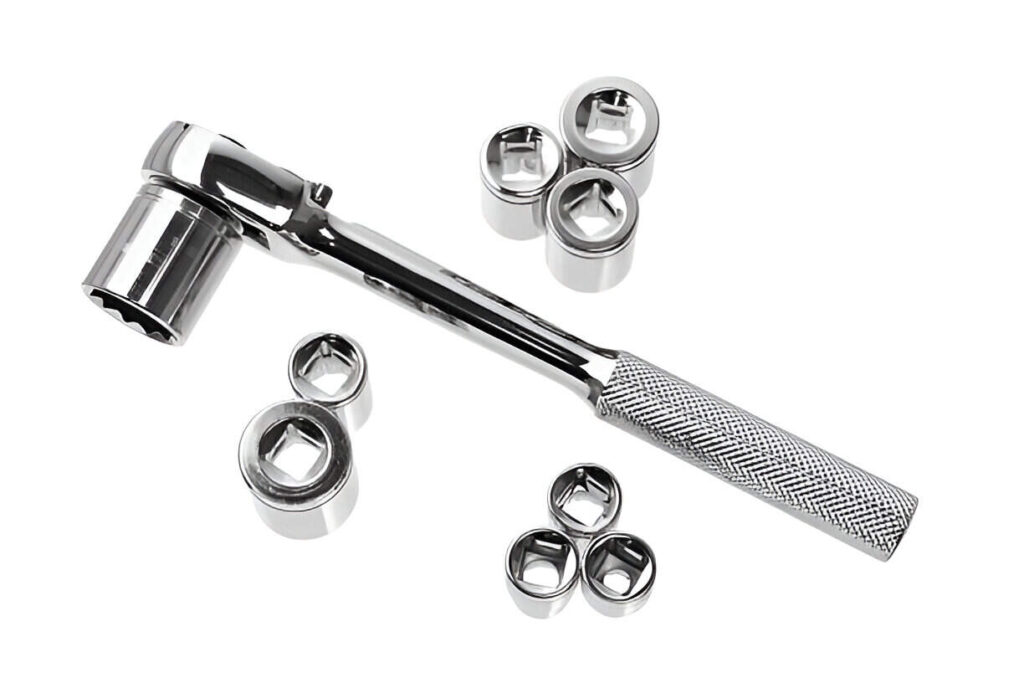
DIY Guide to Using a Plumbing Cleanout Plug Wrench Set A plumbing cleanout is a crucial way to get to your home’s drainage system. If you know how to use a plumbing cleanout plug wrench set, you can save time, money, and even avoid a plumbing disaster. This guide shows you how to make a healthy drainage system step by step, including the tools you need, safety tips, and the best ways to do things according to experts. Why a Plumbing Cleanout Plug Wrench Set Is a Must-Have Tool A plumbing cleanout plug wrench set is made to safely take off heavy-duty cleanout caps without hurting the pipe or the cap itself. It: Gives you safe access to drain lines so you can snake or clean them. Ensures less chance of harm or damage to the cap Quick and easy removal keeps you from being exposed to sewer gas Saves money because you don’t have to cut pipes or hire pros. Understanding Cleanout Components 1. Cleanout Cap To hold a plug in place and stop waste gases, they are screwed into sink or sewer pipes. 2. Cleanout Tee or Plug It gives you straight access to the drain lines for repairs. 3. Drain Line Transports waste water away from devices. A special plug wrench puts torque directly on the cap, which keeps the cleanout fitting from wearing out and makes it last longer. Following proper Plumbing Cleanout Requirements ensures that your system stays accessible, durable, and easy to maintain during future repairs or inspections. How to Use a Plumbing Cleanout Plug Wrench Set Preparing Your Workspace Turn off the water sources that are not needed. Make sure there is space around the cleanout so you can work efficiently. Protect your hands and eyes with gloves and goggles. Using the Wrench Find the correct size wrench for the square cap or bolt-style cap. Place the wrench tightly over the cap. Turn backward; even a tight cap should be able to turn steadily. Let any pressure that is trapped escape safely. Clearing the Blockage If there are clogs, use a drain snake or a hydro-jetting tool. Use water to flush to make sure the flow is working. Reinstalling the Cap Use thread-seal tape to make sure the fit is tight and smell-free. Carefully use the wrench to put the cap back on. Choosing the Best Wrench Set for Your Needs Key Features to Consider The building is strong (for example, forged metal). Different cap sizes can fit different head shapes. Ergonomic handles make it easy to hold on to. Extensions are available for places that are hard to get to. Suggested Tools The heads of impact wrenches have rubber covers that keep them from slipping. T-handle versions for a little extra leverage in small areas. Maintenance Tips for the Wrench & Cleanout System Every time you use a wrench, clean and oil the threads. Check the cleanout cap and replace it if it is broken or bent. Every year, use plumber’s grease or tape to clean the threads on the cap. Safety First: Do This, Not That Do protect your eyes and hands by wearing gloves. Do not use impact tools with more force than is safe, as this could cause caps to crack. If there is a backup, don’t work inside because the dirt lines could release dangerous gases. Expert Insight “If you use a plug wrench, you won’t damage or strip the cleanout cap.” When there are significant blocks, this tool lets you work quickly and cleanly without a hammer or chisels. — Plumbing Expert at FirstFlow Inc. FAQs about Plumbing Cleanout Plug Wrench Set What sizes do I need? For most covers, you’ll need square or hex screws that are between 2.5 cm and 5 cm long. Can this tool work on cast-iron pipes? Yes, but make sure the wrench fits right and that you apply steady, careful pressure so you don’t damage anything. How often should I maintain the cleanout cap? Check once a year or right away after a storm or flood event. References & Further Reading The Spruce – Cleanout Access and Maintenance Family Handyman – How to Use Plumbing Cleanouts Bob Vila – Preventive Plumbing Maintenance Tips
Plumbing Cleanout Cover Maintenance for a Healthy Drain System
Plumbing Cleanout Cover Maintenance for a Healthy Drain System Clean out your plumbing cleanout cover. It’s one of the easiest and best things you can do to keep your home’s drainage system healthy. Clogs can be fixed quickly if you take care of your plumbing cleanout. This will save you money on fixes and leaks. The best ways to make sure your drain system lasts a long time are explained in this guide. Cleanout cover care is essential, and this guide will show you how to do it. Why Plumbing Cleanout Covers Matter Seal Out Blockages: Covers keep dirt, leaves, and other things from getting into the point where you can clean out. Block Sewer Odours: Unpleasant fumes are less likely to get into your home if the cover is tight. Protect Shift-Prone Caps: Covers are great because they keep the cap in place, so it doesn’t fall off by chance. Pest Defence: Rats and bugs won’t be able to get into your pipes if you seal the cleanouts. It is important to keep your cleanout cover in good shape to avoid jams, bad smells, and costly fixes. For more insights on proper maintenance, check out Plumbing Cleanout 101 to understand the basics of keeping your system efficient. Anatomy of a Cleanout Assembly Cleanout Cover (Cap) – Keeps people from getting to the cleanout and holds smells in. Cleanout Tee or Plug – Placed in key drainage areas to make them easy to get to. Branch & Main Sewer Lines – This feature moves garbage away from your home. How to Maintain Your Cleanout Cover Locate the Cleanout Most of the time, you can find them in basements, next to sewer lines, or near foundation walls. Remove & Inspect the Cover Use a wrench or other tools to loosen the screws. Check for rust, cracks, or seals that are too tight and need to be fixed. Clean the Threads & Reseal To clean it, use a rag or a wire brush. Use waterproof thread seal tape to make sure the link is safe and won’t leak. Reattach Securely Use screws to close the cover, but don’t make them too tight. Don’t take the threads off. Inspect Periodically Every six to twelve months or whenever there are clogs, check the cap and the area next to it. Common Issues & How to Fix Them Issue Cause Fix Recommendation Loose Cap Vibration or bad thread Reapply seal tape and tighten cap Damaged Cap Corrosion, wear, root growth Replace with PVC or cast-iron cap Sewer Odors Damp seals, poor fit Clean threads, reseal, and recheck cap When to Replace Your Cleanout Cover Cracks, rust, or other defects that can be seen The garbage smells keep coming back even after the store is closed. Covers being lost or broken. Pick choices that meet building codes and are made of metal or PVC to last. Final Thoughts For your drains to stay healthy and small, you need a pipe cleaning cover. It should also not smell bad. If you clean, reseal, and fix your pipes regularly, you can avoid big plumbing problems. Make sure your Plumbing Vent Pipe is also checked and maintained properly, as it helps regulate air pressure in your drainage system and prevents foul odors. If you take care of your cleanup cover now, you’ll save a lot of money later on. Frequently Asked Questions (FAQ) Q: How frequently should I inspect the plumbing cleanout cover? A: Ideally, you should do this at least once a year, and more often if you keep having drain issues. Q: Sewage overflow may result from an inadequate cleanout cover. A: Indirectly, if the cover lets garbage in, it could stop the sewer line and make it harder to drain. Q: What are the most suitable materials for removal covers? A: Metals that are corrosion-resistant and made for underground use, such as PVC. Q: Is it advisable to dismantle a cleanout cover independently? A: Yes, but be careful and stay away from the area, as sewage or water under pressure could leak out. Reference Understanding Plumbing Cleanouts
Plumbing Cleanout 101: A Homeowner’s Quick Guide
Plumbing Cleanout 101: A Homeowner’s Quick Guide Cleanout access is an important part of plumbing for homes, especially when it comes to plumbing cleanouts. If you have drains that back up often or just want to be ready for anything, knowing about cleanouts can save you time, money, and trouble. What Is a Plumbing Cleanout? It’s a closed pipe that lets water out. That is put on a home’s drain or sewer line so that it is easy to clean, check, or snake when a clog happens. It keeps you from having to cut holes in walls or dig up pipes that are hidden. There is usually at least one plumbing cleanout cover near the base or yard in most modern homes. Why Cleanouts Are Essential Quick access during emergencies: A plumber can clear out clogs in a cleanout before they get into your home. Cost-effective maintenance: Instead of dismantling your Kitchen Sink Plumbing, plumbers can access the main line through the cleanout. Health and safety: Ventilating clogs outside will keep you from breathing in harmful sewer gas inside. Supports video inspection and hydro jetting through the cleanout for accurate diagnostics. Types of Plumbing Cleanouts Outdoor vs. Indoor Outdoor cleanouts: Most of the time, white or black PVC lines stick out near yards or walls. Indoor cleanouts: In garages, basements, or utility rooms, usually close to the floor or drain stack. One-way vs. Two-way Cleanouts One-way: Allows access in one direction. Two-way: Upstream and downstream, it gives you access to the main line and branch lines. Often used near piles of dirt. Locating Your Plumbing Cleanout You may find cleanouts: Near foundation walls (outside) Near the main drain stack in basements or utility rooms Along lines that split off to go to kitchens or bathrooms If you can’t find one, your home might not have one, or it might be hidden in a crawl space or under some plants. How to Use a Cleanout Put on gloves. Use tools or a wrench to unscrew the square-nut cap slowly. Call a plumber if water starts to flow under pressure; they can handle the extra sewage risk. To clear out clogs, put in a drain snake or inspection camera. Re-tighten the cap when done. When & Why You Might Not Have a Cleanout Homes that were built before 1940 might not have cleanouts. A lot of older cast iron pipe systems don’t have them. A qualified plumber can help you add a cleanout if your home doesn’t already have one. DIY Plumbing Cleanout Access Find the cap for the cleaning. To make sure it works, try to take the cap off with a wrench carefully. If it’s blocked, put a drain snake through the hole. Once everything is clear, test all the outlets to make sure they drain properly. Put the cap back on and make sure it’s tight. The cleanout stays effective with regular checks and some greasing every so often. Troubleshooting & Common Questions My cap is stuck: Use WD-40 to grease it and wait a few minutes before turning it. Water gushing out: There may be a lot of people on the main line—stop and call a professional. No visible cleanout: You can also use roof vents or toilets as alternative access points, but it is safer to have a cleanout installed by a professional. Preventative Maintenance Tips Inspect the annual seal and cap to ensure they unscrew easily. Limit flushing of grease, wipes, or non-biodegradable items. Hydro jet or snake through the cleanout yearly to prevent deep blockages. nexgenairandplumbing.com When to Hire a Professional Consider calling a licensed plumber if: You should open the cleaning. You see sewage building up. There is no cleanout fitted, and the drain keeps getting clogged. Your plumber can also add new cleanouts or make entry points bigger if there aren’t any that work. Conclusion A plumbing cleanout that is put in correctly gives you necessary access to your home’s sewer line. This makes upkeep and clearing clogs safer, cheaper, and faster. If you know about plumbing cleanout requirements, you can move quickly in an emergency and keep your pipes in good shape. FAQs – Plumbing Cleanout Q1: What’s the difference between a cleaning and a drain? A cleanout is a plug or line that lets you do repairs. Drains take waste water from fixtures. Q2: How often ought I to check my cleanout? At least once a year, or more often if there are a lot of clogs. Q3: Can I put in a cleanup by myself? Installation requires following the rules and digging, so it’s best to let a professional do it. Q4: Why shouldn’t I use the roof vent to clear out clogs? It’s risky, ineffective, and not safe. There is a better, direct entry through cleanouts.